Authentication
Everything there is to know.
⚙️ How it works
We use the OAuth 2.0 flow for authentication, which is the industry standard for modern and secure APIs.
If you're already familiar with this authentication scheme from working on other APIs, a lot of these concepts will be easy to grasp for you - but if not, read on and we'll guide you through them.
Before we begin...The fastest way to get started is to generate an application and a token directly in the Apicbase UI, no OAuth flow required. See the Quick Start Tutorial.
This page covers the full OAuth 2.0 authorization code flow, which you'll only need if you're building an integration where end users authorize your app with their own Apicbase credentials.
Prerequisites
Before you continue, make sure that:
- If you're a library owner – you've added the API module to your subscription, and you've generated a set of client credentials from the API Settings page.
- You don't have the API module yet? Reach out to your sales contact, or via [email protected].
- This also applies to IT partners of Apicbase customers.
- If you're a partner – you already have access to a sandbox library and you've already generated your client credentials, or you have a set of credentials that was granted to you by the API team.
- Don't have access to Apicbase? Send us an introductory email via [email protected].
☝️ Key concepts
A few terms used throughout this documentation and in the OAuth flow:
- Application (also called Client in OAuth terminology): any party that communicates with the Apicbase API programmatically — a partner integration, an automated sync script, or a library owner's own tooling. Every entity sending requests is an application.
- Client ID: a public identifier for an application. Safe to share and expose in client-side code.
- Client Secret: a confidential key specific to an application, used to generate and refresh access tokens. Must be kept private, never deployed to client-side code, and only transmitted over HTTPS via your back-end.
- Access Token: the bearer token included in every API request. It identifies who you are and determines what you can access. Valid for 7 days.
- Refresh Token: a secondary token used to obtain a new access token when the current one expires, without requiring the user to re-authorize. Not sent with regular requests.
- Authorization Code: a short-lived key (valid for one minute) used only during the initial authorization step to allow a user to grant an application access to their data.
- Resource Owner: the human who owns the data in a library and has the authority to grant an application access to it.
🔀 The Authorization Code flow
This does not apply to supplier integrations.Integrated suppliers have their own authentication scheme, and the information in the rest of this page does not apply to that type of integration. Head over to the authentication for suppliers guide for details.
The OAuth 2.0 specification outlines various authentication flows that cater to different types of applications. For the Apicbase API, only the authorization code flow is supported. The following diagram outlines the steps involved in this flow:
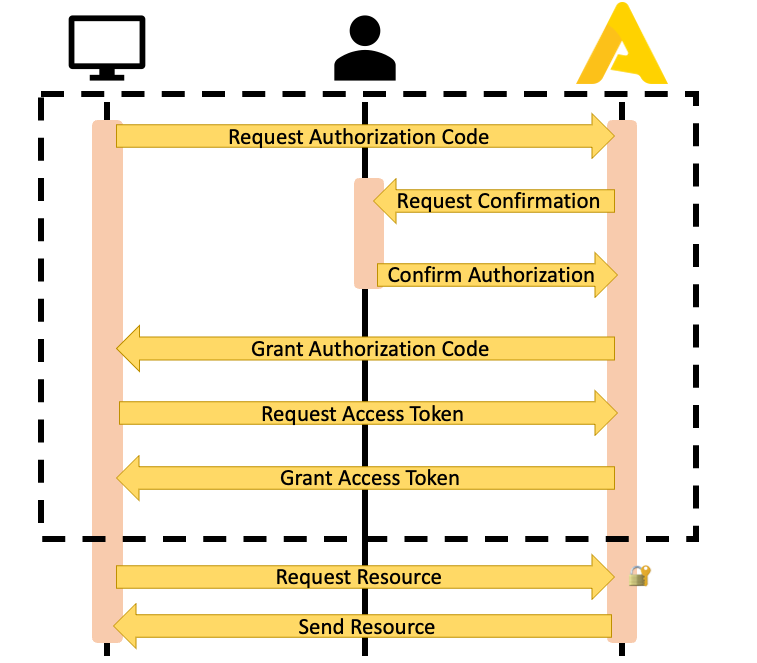
Request the Authorization Code
To begin the authorization process, have the user open the following authorization URL, replacing MY_CLIENT_ID with your application's Client ID and SCOPE1+SCOPE2 with the scopes your application requires (for example, accounts+library):
https://app.apicbase.com/oauth/authorize/?response_type=code&client_id=MY_CLIENT_ID&scope=SCOPE1+SCOPE2This URL contains placeholders.
MY_CLIENT_IDandSCOPE1+SCOPE2must be replaced with your own values before using this URL.
Users will be directed to an Apicbase login page where they will be prompted to enter their credentials. Upon successful login, they will be asked to confirm that they allow the application to access the requested resources.
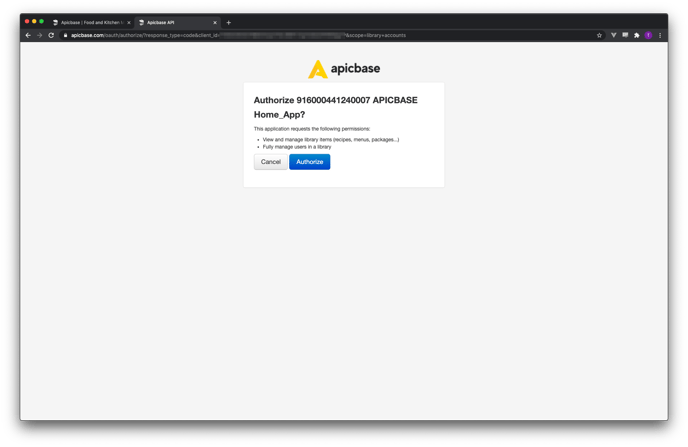
Once the user clicks 'Authorize', their browser will be redirected to your application's redirect URI with the authorization code included as a query parameter:
https://www.your-website.com/your-apicbase-subpage/?code=123456abcdefHost a script at this URL to extract the code and proceed to the next step. The authorization code is only valid for one minute.
Exchange the Authorization Code for a Token
Once in possession of the authorization code, your application must exchange it for an access token. Make a POST request to the https://api.apicbase.com/oauth/token/ endpoint with the following payload:
grant_type=authorization_code
code=YOUR_AUTHORIZATION_CODE
redirect_uri=YOUR_REDIRECT
client_id=YOUR_CLIENT_ID
client_secret=YOUR_CLIENT_SECRET
This request must be encoded as x-www-form-urlencoded.
One alternative is to send the client credentials (client ID + client secret) in the Authorization header, encoded as Basic authentication. In this case, you can omit the client_id and the client_secret from the payload.
Perform this exchange only through secure channels.The exchange involves confidential keys used to access customer data that should only be transmitted via secure channels (HTTPS). Do not perform this exchange using JavaScript or any other client-side methods, and do not under any circumstances deploy your client secret to a distributed app or a webpage. Only connect to Apicbase's authentication server via your back-end.
The authorization server will reply with an access token and a refresh token, as well as the allowed scopes and the access token's expiration time in seconds:
{
  "access_token": "YOUR_ACCESS_TOKEN",
  "expires_in": 604800,
  "token_type": "Bearer",
  "scope": "accounts library",
  "refresh_token": "YOUR_REFRESH_TOKEN"
}
Did you get an error here?No need to fret if you encounter an
invalid_granterror during development! This error usually occurs when you try to exchange an expired authorization code for a token.Keep in mind that authorization codes are only valid for one minute, which can be a bit tight for humans. However, machines can usually complete the exchange within this time frame. If you do run out of time, don't worry - simply start over with a new authorization code and you'll be good to go!
🔓 Making requests with the Access Token
Congratulations, with the access token in your possession, you now have everything you need to start making API requests!
The access token is a bearer token. Include it in the Authorization header preceded by the string literal "Bearer ". Here's an example using cURL:
curl --request GET \
     --url https://api.apicbase.com/api/v2/accounts/users \
     --header 'accept: application/json' \
     --header 'authorization: Bearer AEIOU12345'
🔄 Using the Refresh Token
When an access token expires, your application can use the refresh token to obtain a new one without requiring the user to re-authorize. Make a POST request to https://api.apicbase.com/oauth/token/ with the following payload, encoded as x-www-form-urlencoded:
grant_type=refresh_token
client_id=YOUR_CLIENT_ID
client_secret=YOUR_CLIENT_SECRET
refresh_token=YOUR_REFRESH_TOKEN
The response will contain a new access token and a new refresh token. Discard the old tokens immediately. The previous refresh token is invalidated as soon as it is used, and attempting to reuse it will result in an invalid_grant error.
Store the new refresh token securely and only use it in server-to-server requests. Do not expose it to client-side code or third parties.
The refresh token has no fixed expiration date. A practical approach is to use the access token until the API returns a 401 Unauthorized response, then refresh it at that point.
invalid_grantwhen refreshing?This means the refresh token has already been used or is otherwise invalid. A common cause is a developer using the same refresh token that the production application is relying on. Once used, the production app can no longer refresh its own token. Keep separate credentials for development and production environments.
👤 User permissions and the active library
The OAuth flow produces a Personal Token bound to the user who completed the authorization. This has two implications worth understanding before building your integration:
- Permissions: The token inherits that user's permission set exactly. If the user lacks permission to perform an action, the API will return a
403 Forbiddeneven if the token has the correct scope. Both conditions must be met. - Active library: The token operates on whichever library was active for that user at the time of the request. If the user switches libraries in the Apicbase UI, subsequent API requests will follow — which is rarely the intended behavior for an integration.
If your application needs stable, library-specific access, consider having the library owner generate a Service Account Token from the UI instead. If you need to operate across multiple libraries using a user-based token, see Working with multiple libraries.
See Token types for a full comparison with Service Account Tokens.
🤔 Frequently asked questions
Do I need OAuth to get started?
Not necessarily. If you are a library owner building your own integration, you can generate a token directly from Library Settings → API Settings without going through the OAuth flow. OAuth is required when building an application where end users authorize access with their own Apicbase credentials, and usually only some types of external integrations will need this. See the Quick Start Tutorial to get a token in minutes.
Do tokens expire?
Yes. All tokens expire after 7 days, regardless of how they were generated. Store the refresh token and use it to obtain a new access token before expiry. See Refreshing tokens for details.
Can I have multiple active tokens at the same time?
Yes. Each token is independent, which is useful for separating development and production environments or running distributed applications.
What is the redirect URI?
The URL users are sent to after completing authorization. The default is https://api.apicbase.com/auth-code/, which displays the authorization code. For production use, set it to an endpoint in your application that handles the code exchange automatically.
If you're not implementing the OAuth flow, the redirect URI is not relevant.
My application has no user-facing interface. How do I authenticate?
Library owners can generate a Service Account Token for your application from Library Settings → API Settings → Connected Applications → Manage tokens and share it with you. Let them know which scopes your integration requires.
I need help.
Check the Quick Start Tutorial, it contains detailed step-by-step instructions. If you're really stuck, reach out to our API experts at [email protected] for assistance.
Updated 5 months ago
What’s Next
These topics are also important when you start developing for the Apicbase API: